The game of pool is so entertaining and attractive that people of any age group can get interested in it due to its simple playing mechanism which requires just to hold a stick and hit a ball with it.
If you have developed love for this game and bought a cheap or expensive cue, then you must learn how to handle it.
It may sound effortless on paper, but it sure isn’t when one is trying it out for real. Hence, many people who pick it up only knowing that you have to hit the ball with the stick tend to hold the cue stick most incorrectly.
Many new players will always hold the cue in the wrong manner; there is no way around it. But, with sheer determination and undivided attention, one can hold the cue stick properly by learning its basics and knowing a few methods on how to hold a cue.
The pool cue is the main component and the driving force of the entire game of pool. By holding it correctly, a player can increase their precision, focus, and steadiness – all very important to play pool.
Holding a cue stick in the wrong way, even by just a little can ruin any chance of making a good shot.
There are two important things a beginner needs to understand to hold the cue stick the right way, they are the following:
1. Learning the Basics
2. Learning Bridge Techniques
For a beginner to hold a cue properly and to make the shots with extreme precision, they need to learn the basics of what stance they need to have, how high or low the cue should be, how to balance properly, and what to look for when taking a shot.
One can learn the basics by following the steps given below:
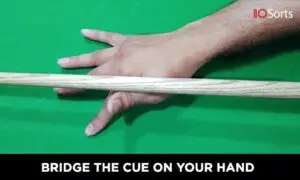
 When you carefully grasp the cue to your waist level with your comfortable hand, use your comfortable hand and grab the rear end of the stick. To see if you have placed your good hand on the right place, check for some tape at the rear. Now, slowly move your hand behind the tape.
There should be a difference of at least 4 inches or 5 inches from the tape. Make sure your right-hand makes a 90° angle with your cue – that is how you will know that you are holding the cue correctly.
Things to Keep in Mind:
 The second step is to look at the table and imagine the shot by focusing precisely. You can do this by dropping your upper body down towards the table, while holding the cue stick with your right hand and gripping the other end of the cue stick with your palm, but do not bridge the tip of the cue with your other hand yet as a little slip can hit the cue ball.
Things to Keep in Mind:
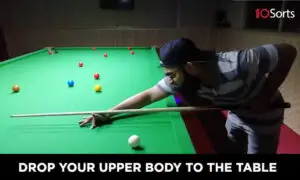
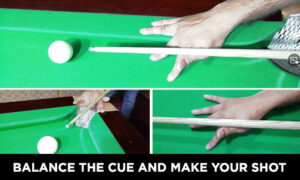
 Now comes the most important part of holding a cue properly to make your shot. Now you can open your palm and put your open hand palm down on the table’s surface right behind the cue ball. The general rule is to keep your other hand at least 6 inches to 8 inches behind the cue ball.
Next, you can cradle the cue stick’s tip with your hand. Put the tip of the cue stick in between your thumb and your index finger. You also have the option to use your middle finger for proper gripping. This kind of cradling is called the open bridge, although there are many different types of bridges, this one is the most common.
Things to Keep in Mind:
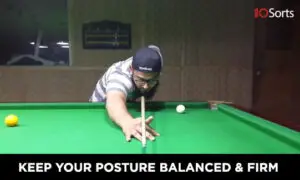 Keep your posture balanced and firm, focus on the object that you want to hit and then focus on the cue ball with your cue. Imagine the shot you want to play to hit the object ball with the cue ball.
Things to Keep in Mind:
 After constructing your shot, slide the cue stick forward and backward to get the right feel for your final shot. If you feel that something is wrong, you can readjust your shot. After readjusting, keep your balance, stay firm, and move the cue forward and backward several times to make sure you will hit the cue ball at its center.
Follow through your planned shot several times, hit the cue ball only when you are 100% sure that your body is firm, your bridge is perfect, and the shot you are about to make is exactly how you want it.
After reaffirming, take your shot by moving the cue back and moving it forward with an adequate force depending upon what kind of shot you want to play.
Things to Keep in Mind:
There are many ways to make a bridge with your fingers, you can learn each technique as many of them are required for specific situations in the game of pool.
The following are the different bridge techniques:
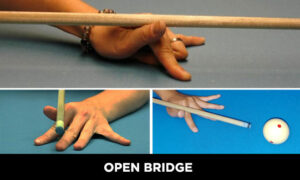 As discussed earlier, this is the most common type or technique of cradling in this game. It is also very easy to learn and master, here’s how:
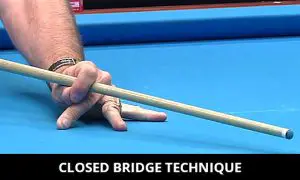
The closed bridge technique makes one look like an actual professional if done right. The technique can also help you to make accurate shots than usual. Here’s how:

This technique is only used when the ball is near to the rail, and your other hand has no room with your specific shot.
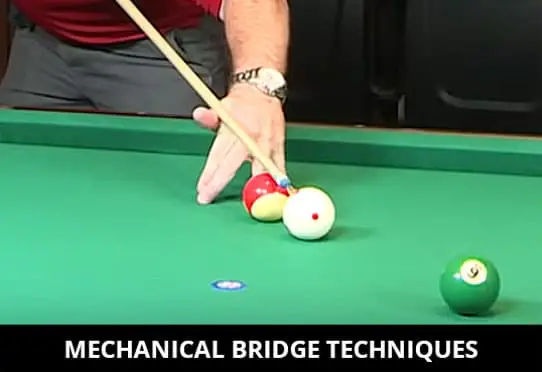
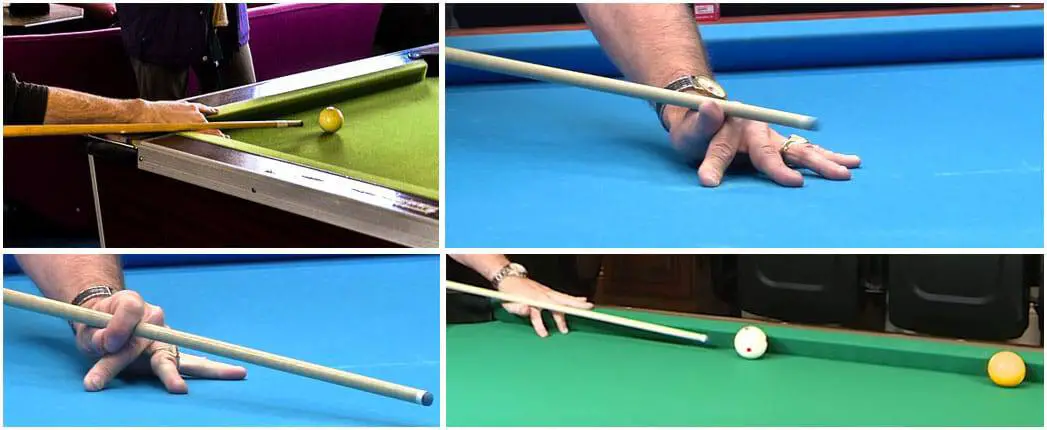
The mechanical bridge is only used when the cue ball is so far away from you that you cannot naturally reach it with your stance.
if you are playing on a larger table, you might need a bridge or extension. Here’s how to use it:
Ensure that the cue stick that you are holding is just the right way for you. Clean the cue so that the cue doesn’t have any problem when it slides on the bridge or hits the cue ball. Be cautious when you are about to take your shot as someone can be behind you, which can disrupt your shot and also injure them.
Through proper practice of playing snooker and following the basics as well as learning different bridge techniques, a beginner can learn to control the cue ball and make a strong foundation for themselves.
If someone doesn’t know the basics of holding a cue, then over the years they will never be able to get better at the game and won’t be able to enjoy it properly. Hence, it is essential to learn all the basics well to improve your game.
