Playing pool with your friends and family is an excellent way to enjoy any indoor leisure time. The elegance of the pool table’s design moves any person into action, and one just cannot resist from playing.
Although the pool table is made up of hardwood and it can last up to 20 years with minimum maintenance but still you should take care of your pool table, it can still ruin any perfect mood of play if the felt is not done correctly or you have broken or warped cues.
If the felt is not correctly done, it can leave the playing surface uneven and creates a problem while playing. Although the felt is fixed and done by professionals because if the cloth is not adequately stretched or even a little bit of dust is left on the surface, then the final playing surface will end up being bumpy or unpredictable.
To avoid such little inconveniences, the re-felt is usually left to the professionals. But it can also be done at home by oneself since the tools used are not expensive or difficult to use. A little patience and it can be done quickly.
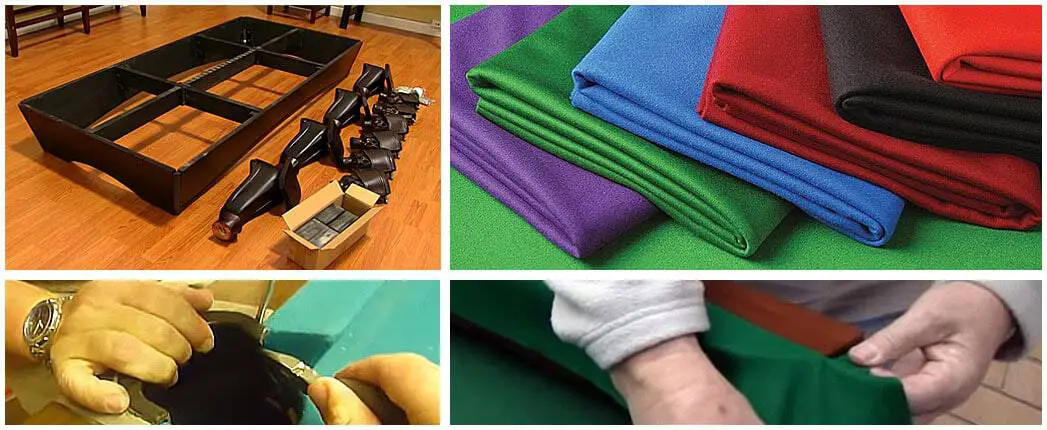
Disassembling is the foremost part of changing the felt. Carefully remove the pocket liners and the bolts which keep the rails in their position. They can be seen under the pool table. Removal of the rails is a very vital part. Now, different pool tables have different types of rails. There can be one, two or four rails under.
Precaution:
Always keep the bolts and rails in a safe place or where they won’t disturb your work. Remembering the rails where they were before removal is so important that if you mixed up the rails from their previous positions, the re-felt would not work properly.
The pool table is made of such material which can last for decades, but the felt does not. It will need the replacing as it wears off. Wearing off is caused by many reasons. Such as;
Two Ways to Remove
When one slides his fingers over the felt, and it feels bristly or dusty, then it’s time to replace the felt. Felt can be removed in two ways.
By Glue: If the felt is attached to the table with the help of glue, it can simply be removed by ripping it off. Sometimes while ripping off the felt, pieces of glue remain behind on the table, and that can be removed by scraping it off. Be careful not to damage the table while scrapping.
By Staples: felt is also attached to the table with the help of staples. Simply, remove the staples by the help of a staple remover.
Pool table is made up of slate. It is an almost permanent material which can last for years. That is why; the pool table is usually a one-time expenditure. When re-felt is being done, after removing the previous or worn out felt, it is recommended to clean the slate.
Use a dry cloth to remove dust. Never use any wet cloth or any dusting spray as it can cause dampness and softness in the slate. If there are any old glue residue, scrapped it off and wiped off with a clean, dry cloth.
Measure the size of your pool table using a measuring tape. Always keep in mind to buy some inches extra as it can always come in handy.
After getting an accurate measurement, go to any sports shop to buy the felt. Now felt comes in various colors so if you want to change the color, now is the time.
After purchasing the felt, lay it on the table and let it sit. Run your fingers over the felt to feel any bump or roughness underneath. The felt should feel plain and smooth.
After that, take a sharp pair of scissors and cut the felt according to the measurement you have taken before. There should always be a good amount of felt left behind after cutting so that felt can be used to re-felt the rails.
This is the part where people usually look towards the professionals. But re-felting is not that difficult that you cannot do at home or by yourself.
It often requires the help or assistance of another person, but you can do it all by yourself. It needed the following step;
Step 1: Stapling of The Felt:
This is a most essential part of re-felting a pool table. Although every step is equally important in the whole process of re-felt, the main essence or the main art lies in actually felt replacement and its stapling.
Now from onwards, the following steps should be taken very seriously. Otherwise, you will not be able to get a wrinkle-free, bump-free or dust-free felt for your pool table.
Step 2: Layered or No Layered:
Usually, the pool tables have a layer of the board or wooden particle layer underneath the slate. It easily allows the stapling of the felt to the table. Usually one needs a manual stapler or a staple gun to staple the felt to the table.
You can always check underneath the slate by looking at the vertical edge of the table.
Step 3: Trimming of The Felt:
Usually, the cloth for the pool table comes in one piece. But it is recommended that you should cut it into pieces with the help of the instructions that come with the purchased felt. Some felt are cut by razor sharped blade or box cutter and in some felts, you can make a cut of one inch (2.5 cm) and then rip it off with hands in one straight line.
Step 4: Rolling of The Felt:
It is such an important part that you should know which face is up of the felt. No one wants to go through all the trouble of re-felt and realize in the end that they have re-felt the wrong side up. Usually, there are some stickers or pointers to guide you but if there is not, do consult a professional.
Step 5: Cutting and Stapling:
When you have laid out the felt on the table, start from the head side. Use a staple gun to staple the felt. It is recommended to have an assistant who will help in the stretching of the felt. Remember to follow the following pointer while stapling;
Pay particular attention to the last side. If you have not been able to pull the felt enough and still there are few wrinkles or loose felt somewhere on the table, the foot side of the table is the last try u can put to avoid or remove all the wrinkling of the felt.
Pull enough to tight the felt and staple. Once the desired felt is achieved, staple along the side with equal differences.
Unlike the stapling, the glue is applied directly to the slate. If you are opting for the glue since your pool tables do not have the layered-board, follow the following step;
This is the last but an essential part of re-felting the pool table. Follow the following steps carefully.
When all the elements of any game are up to the usual standards, only then you can enjoy the game to the fullest. The same rule applies to the pool table. If the felt is worn out or old enough to slow the game, then the charm of the game is lost.
Always going to a professional can sometimes cause you discomfort. That’s why it is always better to do things by yourself.
If you still want to ask something, let us know in comments.